My Road Tire and Tubeless Manifesto
- Anna and Aaron

- Jul 7, 2025
- 11 min read
Updated: Aug 2, 2025
Tires are one of the best upgrades you can make for your bike and tubeless is the way to go. There is a ton of information on the internet about tires and tubeless but many times it goes into too much detail or is just a sales pitch, so I wanted to share an overview and a few tips and tricks I have learned over the years. In this post I will cover:

Tire Choice
Tires are one of the most cost effective upgrades you can make on your bike for speed, comfort and overall better experience while riding. The latest studies and testing has disproven the old theory that narrow, rock hard tires, are the fastest. Now, backed by data, the latest trend is moving to wider tires at lower pressures. The increased width allows you to reduce the pressure and when you set them up tubeless, you can run even lower for a smother and faster ride.
While you can spend way too much time researching sites like Bicycle Rolling Resistance finding the absolute fastest tire, its important to remember race specific and time trial tires are for exactly that, racing! When you are cruising out of the city and on the roads by yourself you do not have a sag car or moto behind you with a spare set of wheels at the ready. While a super fast tire may shave off a few minutes on your ride, those gains will be lost and then some as soon as you get a flat and have to take the time to change it.
Rubber compounds and tire tech has improved so much you can now get puncture protection in a tire that out performs a race tire from just a few years ago. In my opinion for a road bike there are really 2 choices and they have almost identical specs. Pirelli P Zero Race TRL or Continental GP5000 AS TR (all season). These are both tubeless ready and are not the race specific (RS) or time trial (TT) versions so they have great puncture protection.

Tire width is also an important factor. As mentioned the data now shows wider is better on most road surfaces and at the speeds us non pros ride at, so if you have not jumped on the wide tire train, now is the time. I think 32mm is quickly becoming the go to choice. If you have a frame with narrower clearance or rim brakes you may be limited to something smaller, but if thats the case just go as big as you can. One nice thing about the Pirelli's is the 30mm option which is really great if you have tight clearance and can't swing the 32mm.
Tubeless Overview and Setup
After choosing proper tires, setting them up tubeless takes them up another notch. Tubeless technology for bikes has been around for well over 30 years, starting off in the mountain bike world. The shift to use for road is more recent but it has evolved to be my personal choice and one I recommend to everyone. Sealants have improved and the trend for wider tires has significantly reduced the tire pressure, allowing the sealant to be more effective. This combo enable you have your tires at a comfortable pressure that is also faster and further decrease the chances of puncture issues.
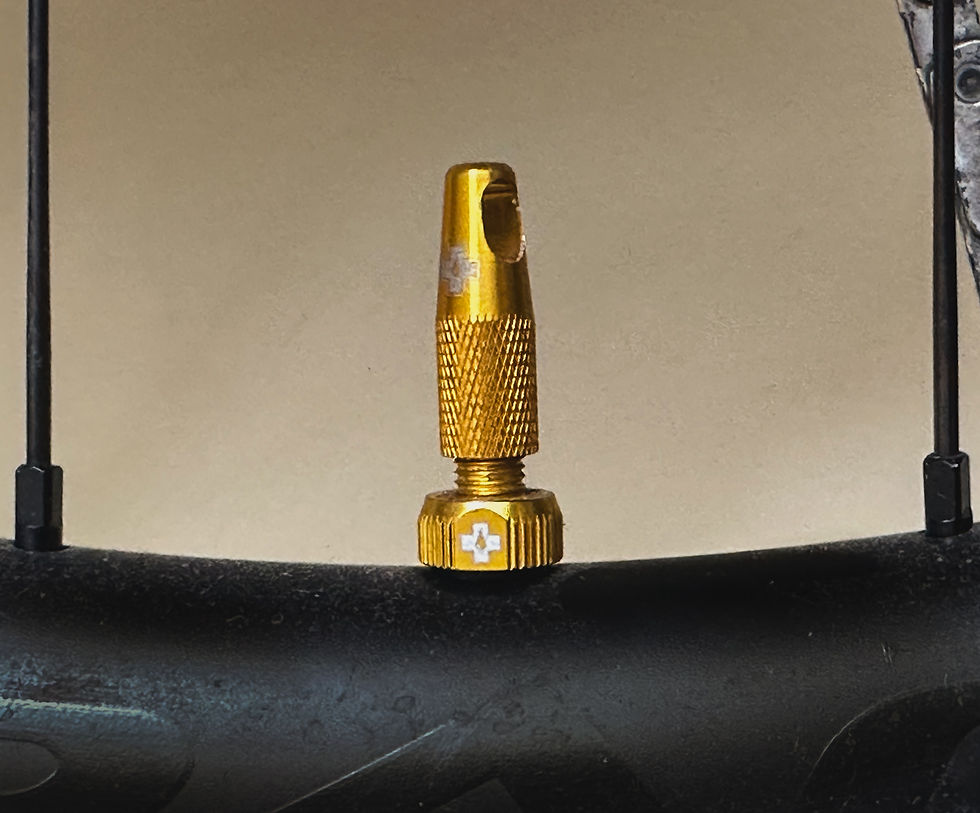
Simply put, a tubeless bike setup removes the inner tube and add a liquid inside the tire that seals any leaks and punctures. In order for the sealant to stay inside the wheel, you must have tubeless rim tape installed which seals the spoke holes and the rest of the rim. Then you need to install a valve stem, since that is usually part of the tube. Historically these tubeless valve stems were a presta valve but there are now several manufacture making options that remove the valve core and allow more air flow and less probability for clogging. The most important factor for choosing a valve stem is of course color followed closely by length to ensure it is compatible with the depth of your rims.
When getting rim tape it is important that you know the internal width of your rim so you can purchase the correct size. It needs to be wide enough to seal off your rim but not go up on the sidewalls. You can look up the internal width of your rim online or measure it if you cannot find it. For road bikes it will likely range from 19mm to 25mm depending on the rim. There are tons of choices for brands and I have yet to find one I am particularly passionate about.
The next thing you will need is the sealant. There are a lot of different manufactures and options out there but I highly recommend choosing Silca Ultimate for road tires. As mentioned tubeless started off in the mountain bike world with much higher volume tires running at less than half the pressure of a road tire. This means many sealants were not designed for pressures above 40 psi, so while they may perform great on a 2.4" tire, it may not be able to seal much on a 28mm tire at 80 psi. I have tried other brands but had the most success with Silca on my road bike.
The other factor in sealant choice is whether it is injectable or not. Some sealants have such big clumps in them you have to pour them into the tire before fully seating the tire. While this is more of a hassle for setup, historically it meant that it would seal larger puncture better. Stans Race and Silca's original sealant require you to do this. Silca has since updated to a single step sealant that can be injected and claims to have similar performance. I have not done extensive testing but can confirm it injects unlike the original.
Based on your sealant the next step is to mount your tire, either fully or most of the way. If you have injectable sealant you should mount your tire and fully seat it. Seating your tire means you fill the tire with air, usually rapidly, until you hear it pop into place along the bead. It depends on your specific tire, wheel, and pump combination if you will be able to get the tire to seat with a standard pump. Often you need a quicker rush of air to get the tire to pop into place, so if its not working there are several option for this. Most bike shops will use an air compressor which is without a doubt the easiest option but not very accessible for most in the city. They also make specific pumps with expansion chambers that are very convenient but are costly and you likely already have a regular floor pump so you don't need another.
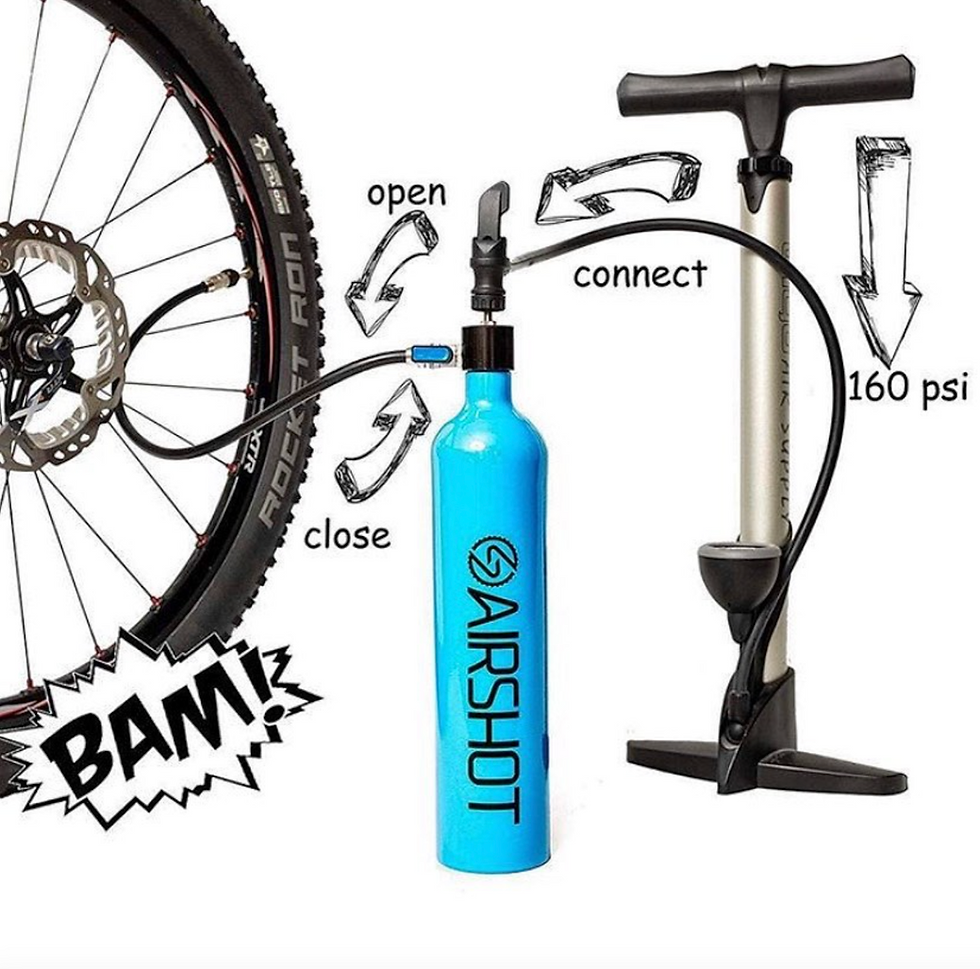
The option I use is an airshot which is a separate expansion chamber that connects to your existing floor pump. They are relatively inexpensive and work very well in my experience. In order to maximize flow, you remove the existing presta valve core in order to attach the airshot. To use it, you screw the hose into your valve stem and then pump up the chamber to around 160psi. You then turn the valve on the canister and dump all of that air into the tire almost instantly. It can be slightly terrifying to do at first but you get used to it. If you are having issues getting your tire to seat you can spray a bit of soapy water around the bead to help lubricate it and slide into place.
Once your tire is seated, I let out the air via the presta valve on the airshot, I don't like to release the air too fast and cause the tire to pop loose again. Now you can fill up your injector with the correct amount of sealant based on your tire width and the sealant manufacturer recommendation. If you are in doubt, I always like to overshoot the amount of sealant since it just adds more protection and a few extra grams is not going to be the reason I can't beat Pogačar's time up a climb. I like to squeeze some of the air out of the tire before attaching the injector to avoid it spraying you when you remove the injector.
If you have a sealant that you cannot inject, you need to pour it in before seating the tire and then finish mounting your tire, carefully as not to spill your sealant everywhere. The process to seat it is the same you will just already have the sealant inside, so be conscious of the valve orientation when filling and releasing the air.
Once the tire is seated with sealant you can reinstall your valve core and inflate to your desired pressure. I recommend looking at a pressure calculator for anyone, but especially when you move to tubeless because now you can and should run a lower pressure then you are used to. I use the SRAM calculator but there are many out there including one from Silca.

Tubeless Repairs
Now that you are setup tubeless what else do you need to know? One of the main questions I hear is "what do I do if I get a flat?" If you hear air coming out or feel a spray of sealant on your leg, pull over and check it out. First find the puncture and see if there is anything still in there. Depending on the size of the object and the hole if leaves, you can spin the tire to distribute the sealant and get it to stop the leak. If you remove the object and the sealant does its job, you are good to go and you don't need to worry about it.
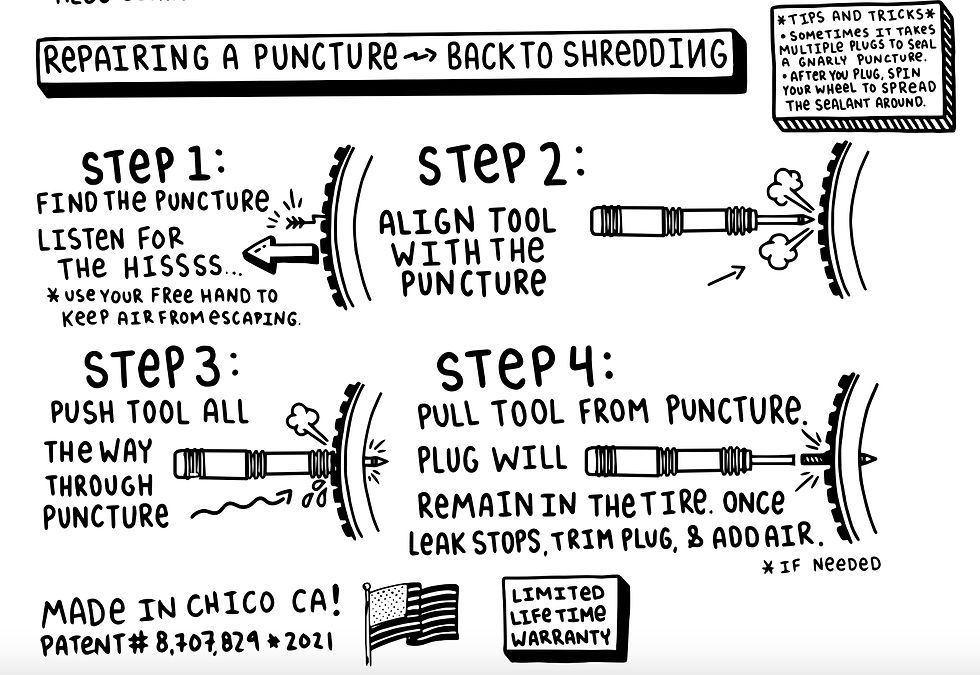
If the hole is too big for the sealant to stop on its own you will want to have a plug kit on hand. Tubeless plugs add additional material to the hole in your tire so that the sealant can then seal around it. There are a variety of options for these as well but I highly recommend Dynaplugs. They are a bit challenging to acquire in Europe as they are often out of stock but that is for good reason, they are the best. There are several other manufactures and types of plug kits but Dynaplugs are my weapon of choice.
Dynaplugs offer a single step process of jamming the tool into the hole and then removing it, leaving the plug behind. You can get tools the hold multiple plugs and buy refill packs as needed. With any plug kit/tool its important to make sure when inserting, you do not damage your rim tape. If you have lost a lot of pressure it helps to squeeze the tire around the hole to hold it up and away from the rim bed as you insert the plug. Once the plug is in you can spin the tire around to distribute some sealant around the plug. After you re-inflate your tire you can either trim the excess plug material on the outside or you can just let it get smashed down and wear off. If the plug is installed and no longer leaking I consider this to be a permanent fix, at least with dynaplugs. I frequently ride thousands of kilometers with multiple plugs in my tires and never think twice about It.
For tubeless to work properly you need to have some sealant left in your tires. If you have an incident where you spray a lot of sealant before it seals its self or you plugging it, you will want to top off your sealant when you get home so you are ready for the next time. Sealant will also dry up over time. Depending on the sealant, the manufacture will have recommended intervals to add additional sealant. I like to physically check the levels every couple months and then top up as needed. To do this I just pull the valve core and rotate the stem to the 6 o'clock position. I then use a small allen wrench as a dip stick to see how much fluid is left. Just like during the setup, I always err on the side of more than less with sealant. Better to have a few extra grams than have to put in a tube on the side of the road.
If you do run out of sealant for any reason or you get a hole too large to plug, then you will need to throw a tube in. Even with a plug kit, I always bring a spare tube because you never know. The other failure that can happen is the rim tape. If you are seeing sealant or hearing air coming from the spoke nipple holes, it means that your tape has failed or punctured. If this happens on the road you will have no choice but to put in a tube.
Putting in a tube is not a problem with tubeless. Just pull off your tire, remove the valve stem (throw it in your bag or pocket for later) and dump out any remaining sealant. While it can be a little messy, don't worry about the remaining sealant, just dump the majority. If you have plugged your tire before, particularly dynaplugs, make sure you remove the metal tips left inside your tire before installing a tube. I have found if you rotate the metal tip around a few times it usually will pop off the plug easily. It doesn't hurt to have a little knife with your plug kit for this and to trim the excess on the outside when first putting a plug in. Some kits come with a little blade, otherwise a keychain knife works well.
My last note is about clogged valves. Tubeless sealant is designed to plug holes and your valve stem and core are technically holes... When storing and adding air you should pay attention to the orientation of the stems to avoid sealant getting in them. As sealants have improved at sealing punctures they have also started clogging the valves more. As I mentioned there is a shift away from traditional presta to aid in this but regardless, it is an easy fix. If you go to add air to your tires and you feel a lot of resistance or even cannot get air to enter, it is because of a clogged valve. To fix it just remove the valve core, clean it out or replace it, and make sure the stem is also clear. For the stem I like to use a small brush that comes with metal straws. After its cleaned out, re-install and get back to it.
Choosing modern tires with puncture resistance and running them tubeless has been a game changer for me. I find the ride much more comfortable and love not having to deal with frequent punctures. While there is some more work up front involved with tubeless, any cons are completely outweighed by the pros.

Tubeless Tips and Tricks Summary
Don't overthink it, just go tubeless, it's worth it
Make sure you are running the optimal pressure
Carry plugs
Always bring a spare tube
Err on the side of more sealant than less
Don't forget to pull off the plug tips if you have to install a tube
Buy a valve cap with a core removal tool
Have a handful of valve cores on hand for clogs
Throw a valve core in your spares kit
Use the brush that comes with metal straws to clean out your valve stems
Store wheels with stems at 6 o'clock to avoid clogging
Pay attention to valve orientation when adding air
Use teflon plumbing tape if you have a slow leak around your valve core
If you hear air rushing out when setting up, it's likely your rim tape failed
Don't forget to check your sealant level and top up
Bring extra sealant when bikepacking or for ultras
Carry a Presta to Schrader valve adapter to reseat a tire in the wild on long adventures (using a car tire refill station)
Don't use C02, and if you do, let it all out and replace with air at home
Use a natural rubber eraser to remove old dried sealant from inside your tires
Don't be the reason the group has to stop, switch to tubeless today...


Comments